Saturday, June 4, 2011

How To Force Internet Explorer 7 To Save Web Site Password After Answering No


How To Force Internet Explorer 7 To Save Web Site Password After Answering No


I recently visited a site that required me to logon. After receiving my account information, I went back to the site and enter my account and password, I was not paying attention and answered no when Internet Explorer asked if I wanted save my password. I looked around in Internet Explorer Options but could not find a way to save the password without deleting all saved passwords. How can make IE save the password?

Internet Explorer 7 uses a feature called AutoComplete to store passwords and other information that you type into web form fields when it is enabled. With AutoComplete for user names and passwords, IE 7 will prompt you before saving the account information.
ie7pwdsave1.jpg
If you select No, Windows will record the site information in the registry, so Internet Explorer 7 will not prompt you again the next time you visit the site. Since IE does not provide any way to easily edit account/password information, the fix involves making an easy registry hack to modify the site that you answered No for saving the password, while keeping all other information the same.
NOTE: Follow the below steps exactly as specified and do not make any changes other than specified while in the Registry. Always create a System Restore point or backup of you Computer when making configuration changes.
1. Close Internet Explorer
2. Click on Start / Run… and in the run field type regedit (you will need to have administrator rights to edit the registry)
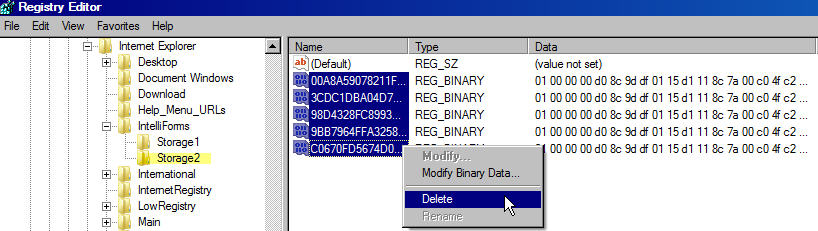
3. Navigate to HKEY_CURRENT_USER\Software\Microsoft\Internet Explorer\IntelliForms\Storage2
4. In the left window pane, select the Storage2 key, then from the menu, select File / Export and save the key to your Desktop with the File Name: oldstorage.reg
5. In the right window pane select all values (except for Default) then press Delete and select Yes to confirm value delete. Minimize Regedit.
ie7pwdsave2.jpg
6. Open Internet Explorer and visit the web site whose password you want to save. When Internet Explorer asks if it should remember your password, answer Yes

7. Logout of site and close Internet Explorer


8. Return to Regedit and press F5 to refresh the list. Now, select the Storage2 key, then from the menu, select File / Export and save the key to your Desktop with the File Name:newstorage.reg


9. Select the Storage2 key again, then from the menu, select File / Import and select theoldstorage.reg file (from the Desktop), and click Open to merge the data back into the registry. Click OK to acknowledge merge was successful.


10. Select the Storage2 key again, then from the menu, select File / Import and select thenewstorage.reg file (from the Desktop), and click Open to merge the data back into the registry. Click OK to acknowledge merge was successful.


11. Close regedit.

Now all your previously saved passwords will be preserved without wiping out the site you just created.

Make Internet Explorer Prompt You To Save Passwords After Being Disabled


Make Internet Explorer Prompt You To Save Passwords After Being Disabled


First let's solve the mystery of how IE asking to save passwords become disabled.
The most likely cause is checking the box "Don't offer to remember any more passwords". Once checked, even if you answered Yes or No, IE will no longer prompt you to save passwords.
iepwdac4.png
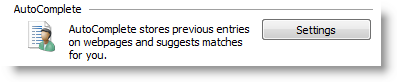
The other method (of disabling), is actually where we'll enable password prompting, by clicking on Tools \ Internet Options and select the Content tab. Then click on the Settingsbutton next to AutoComplete in IE 7…
iepwdac5.png
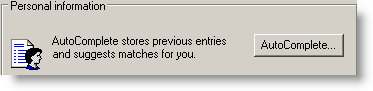
…or click on AutoComplete button in IE6.
iepwdac6.png
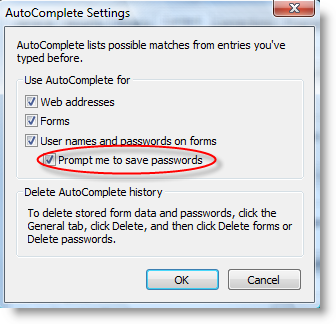
Now you just need to click on "Prompt me to save passwords" and click OK.
iepwdac7.png
Next time you visit a web site that you need to logon, you should see the prompt to save passwords.

!!!! Add images in Orkut status !!!!


!!!! Add images in status !!!!

Hello guyz!


Today I gonna tell u that how to add images in orkut status bar

follow the steps:-

1. <#img src='#http : //img4 . orkut.com/img/smiley/ ( copy dis code ) ( remove space and #)

2. Paste on notepad

3. Goto image which u want to insert on status (Using Mozila)

4. Right click and Copy image Location

5. now paste after above code where u copied on notepad

6. now change IInd http://img4 into http://img3

7. now copy all code and paste in status


enjoy....

[Trick]Share Internet Connection in With another


[Trick]Share Internet Connection in With another

↘↘↘↘
How To Share Internet Connection in XP Without Wireless Router

Let’s say you have a laptop that is equipped with both ethernet(wired) and wireless network adapter and it is connected directly to the Internet using an ADSL modem. Now your younger brother also bought a new laptop and wants to use the Internet. Instead of spending money in buying a wireless broadband router, you can save up the money and share the Internet from your laptop using the built-in wireless network adapter.


If you have a desktop computer that don’t have built-in wireless adapter, you can buy a USB wireless adapter for less than 7-800\- or US$10 and it is so much cheaper compared to a router. Here’s how to share Internet connection from your laptop or desktop that is equipped with wireless adapter.
- - - - - - - - - -

First we’ll need to setup the HOST computer. HOST means the computer that is directly connected to the Internet via ADSL modem and it will be the one that is sharing the Internet connection. Go to Control Panel > Network Connections, you should see a Local Area Connection, Wireless Network Connection and a connection dailer (I use Streamyx). In detailed view mode, it shows a lot of useful information regarding your connections.


↘↘↘↘
Below are the steps to configure the HOST computer:
1. Right click the connection which you use to connect to the Internet and select Properties. Go to Advanced tab and check “Allow other network users to connect through this computer’s Internet connection”

2. Click the drop down menu and select “Wireless Network Connection“. Click OK.


3. Go back to Network Connections, right click Wireless Network Connection and select Properties.

4. Go to Wireless Networks tab.

5. Click Advanced button, select Computer-to-computer (ad hoc) networks only, and make sure that Automatically connect to non-preferred networks is UNCHECK. Close it.

6. Click Add button and Wireless network properties Window will appear. Enter any Network name (SSID), and change Data encryption
to Disabled. You can change it to WEP when everything is working fine.


7. Right click at the wireless adapter icon from system tray and select “View Available Wireless Networks“. Select the Network name (SSID) that you entered at step 6 and click Connect.


The HOST configuration is done. From what I read on most guide, step 7 above is not necessary but don’t know why if I don’t do that, the CLIENT won’t see the HOST in the wireless network list.
Next, we’ll need to configure the client computer now which is very simple. CLIENT computer means the laptop or desktop that will be connecting to the HOST computer.


↘↘↘
1. Right click tray wireless adapter icon from system tray, and select “View Available Wireless Networks”. Select the HOST computer and click Connect.


The client computer will automatically acquire IP address
from HOST computer because Internet Connection
Sharing is enabled. It might take a while, so be patient. Now both the HOST and CLIENT computer can connect to Internet and also share files with each other. See, sharing Internet without wireless router
wasn’t so hard now, was it?


How T0 HaCk GmA!l AccOunt PaSSw0rd (For n00bs)


How T0 HaCk GmA!l AccOunt PaSSw0rd (For n00bs)


PROCEDURE:


) Download Gmail Fake Login Page
http://hackapc.com/wp-content/uploads/2010/05/GMAILPHISHERbyhackapc.com.rar
2)Extract the contents into a folder

3)Create an id in www.my3gb.com , because i know about that site quite well


4)Then upload the contents into a directory(For that,after creating an id you should go to file manager and upload all these files)

5)After that just got to ServiceLoginAuth.htm and try out whether its working .

6)After opening it,you just enter any user name and password And after you type a password file will be created in the same directory named as passwd.htm

7)Then you can see what username and password you have entered.That’s it now you can give this link to your victim and when the victim login through you fake login page his passwords will get saved into the passwd.htm file


njoy Hacking And Make Sure that you subscrib